CI is a very interesting area where Kubernetes can be applied. It's a common use case to have a demand of containers to be able to run tests of code changes, or to create some build artifacts.
In this post I will be explaining how to use Kubernetes to spin up Jenkins slaves and connect them to a Jenkins master, allowing to run tests on demand, and have a very easy and fast way to scale depending on our needs.
https://wiki.jenkins-ci.org/display/JENKINS/Swarm+Plugin
For Jenkins Swarm Plugin to work, you need to enable CSRF. You need to visit http://url.to.master/configureSecurity/ and check the Prevent Cross Site Request Forgery exploits option.

 After that, add the rules you need on your firewall, to allow connection between Jenkins master and slaves using that port.
For this purpose, i've created a Docker image that is available at https://hub.docker.com/r/yrobla/jenkins-slave-swarm-infra/ *. This image is based on general Docker java images, using version 8. In top of that, we download the Jenkins Swarm client to be able to connect this node to the Jenkins master, and we also add some extra packages that are needed normally to peform python tests.
* Based on https://hub.docker.com/r/csanchez/jenkins-swarm-slave/
https://github.com/kubestack/kubestack/blob/master/jenkins/replication.json
You can create this replication controller using Kubernetes API:
export JENKINS_USER=jenkins_user
export JENKINS_PASS=xxxx
export JENKINS_LABEL=label
kubectl create -f ./replication.json
* Please note that label is an optional parameter, very useful when you need to limit the jobs that run in this type of container.
Once the replication controller has been created, you will see a new jenkins slave connected to your jenkins master.
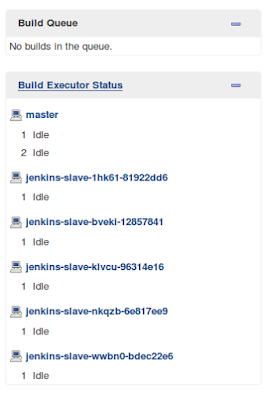
kubectl scale --replicas=5 rc jenkins-slave
This command automatically creates and attaches 5 jenkins slaves to your master:
 Using this technology gives you a very powerful and easy way to perform your tests or build your artifacts, with the only limit of the minions you are able to provide in your Kubernetes cluster.
In this post I will be explaining how to use Kubernetes to spin up Jenkins slaves and connect them to a Jenkins master, allowing to run tests on demand, and have a very easy and fast way to scale depending on our needs.
Pre-requisites needed on Jenkins master
Installing Jenkins plugin
This approach relies on Jenkins Swarm Plugin. So you need to ensure that you have installed this module on your master:https://wiki.jenkins-ci.org/display/JENKINS/Swarm+Plugin
For Jenkins Swarm Plugin to work, you need to enable CSRF. You need to visit http://url.to.master/configureSecurity/ and check the Prevent Cross Site Request Forgery exploits option.

Configure security
Also consider that Jenkins uses a random port to enable connection to slaves using JNLP. If you are under a protected environment, you may desire to choose a fixed port and enable security rules for it. To achieve that, you need to visit the configureSecurity url again, and set up the port for Jenkins slaves:
Configure credentials
Jenkins Swarm plugin will use jenkins credentials, that needs to be passed to the slave, to connect to the master. So be sure to create some credentials for the Jenkins master domain, based on user/pass. You will need the https://wiki.jenkins-ci.org/display/JENKINS/Credentials+Plugin to achieve it.How to create a Jenkins slave using Kubernetes
Create the image
First item that we need, is a docker image that is capable to act as a Jenkins Swarm slave, and capable to run some tests on it.For this purpose, i've created a Docker image that is available at https://hub.docker.com/r/yrobla/jenkins-slave-swarm-infra/ *. This image is based on general Docker java images, using version 8. In top of that, we download the Jenkins Swarm client to be able to connect this node to the Jenkins master, and we also add some extra packages that are needed normally to peform python tests.
* Based on https://hub.docker.com/r/csanchez/jenkins-swarm-slave/
Integrate with Kubernetes
To use this image in Kubernetes to be able to scale on demand, a replication controller that uses this image needs to be created:https://github.com/kubestack/kubestack/blob/master/jenkins/replication.json
You can create this replication controller using Kubernetes API:
export JENKINS_USER=jenkins_user
export JENKINS_PASS=xxxx
export JENKINS_LABEL=label
kubectl create -f ./replication.json
* Please note that label is an optional parameter, very useful when you need to limit the jobs that run in this type of container.
Once the replication controller has been created, you will see a new jenkins slave connected to your jenkins master.
Scale it!
Now you can scale the number of your jenkins slaves on demand, using Kubernetes API:kubectl scale --replicas=5 rc jenkins-slave
This command automatically creates and attaches 5 jenkins slaves to your master:

Thank you for sharing very useful blog!!!!
ReplyDeleteDocker and Kubernetes Training
Docker and Kubernetes Online Training
Docker and Kubernetes Training in Hyderabad